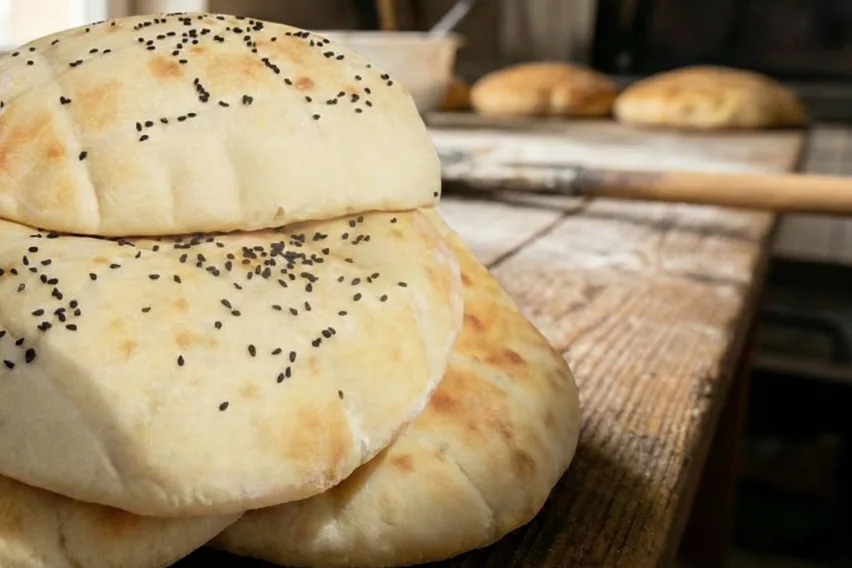
Bosnian Somun
Bosnian somun is a soft, round flatbread with a light crumb, a thin golden crust, and a diamond pattern pressed into the top. Nigella seeds add a savory, gently peppery flavor. Serve it warm with ćevapi, use it to scoop up a stew, or tear off a piece to enjoy with ajvar or kajmak.
This home-oven version relies on a wet dough and a thoroughly preheated baking surface. The dough stays sticky, so damp hands and a bench scraper do more useful work than extra handfuls of flour. Gentle shaping preserves the air that develops during the rises.
Allow about 2 hours and 45 minutes from mixing to serving, including the final rest in a kitchen towel. The oven heats while the dough rests, and the breads bake in small batches. Weighing the ingredients gives the closest match to the intended dough texture; both US and metric quantities are available in the recipe below.
Bosnian Somun
Ingredients
- 17 2/3 oz all-purpose flour preferably unbleached; weigh for best results
- 1 1/2 cups lukewarm water for the initial dough; 82–86°F (28–30°C)
- 2 1/4 tsp instant dry yeast
- 2 1/2 tsp sugar
- 2 tsp fine salt
- 5 tsp lukewarm water for dissolving the salt
- 8 tsp water for wetting hands and shaping
- 2 tsp nigella seeds also called ćurekot; not ordinary cumin
Equipment
- Kitchen scale Recommended for the flour and salt.
- Mixing bowl Large enough for the dough to rise.
- Stand mixer Fitted with a dough hook.
- Bench scraper For handling the sticky dough.
- Measuring jug For the separate water quantities.
- Parchment paper For shaping on a cool surface only. Remove completely before loading; no paper goes into the oven.
- Heavy sheet pan Oven-safe at 480°F (250°C); preheat inverted for at least 35 minutes. Use a dry wooden peel or a second, cool inverted sheet pan to load the dough.
- Kitchen towel Clean; for covering and softening the baked bread.
Method
- Start the dough. Stir the yeast and sugar into the water listed for the initial dough. Add the flour and mix with a dough hook on low speed for about 2 minutes, until no dry patches remain.
- Rest, then add salt. Cover the shaggy dough and rest for 15 minutes. Dissolve the salt in the separate water listed for dissolving the salt. With the mixer running on low to medium-low, gradually work in the salt water. Knead for 6–8 minutes, until more elastic but still soft and sticky.
- Let rise and fold. Cover and let rise at warm room temperature for 45 minutes. After about 20 minutes, wet one hand and stretch and fold the dough toward the center from all four sides. Cover again for the remaining rising time.
- Divide and rest. Turn onto a lightly water-dampened surface. Divide into portions of about 8 oz (226 g) each. Gently round with damp hands, cover, and rest for 20 minutes. Avoid adding extra flour.
- Preheat the baking surface. While the dough rests, preheat the oven to 480°F (250°C), conventional top and bottom heat. Place a heavy, inverted sheet pan on a lower-middle rack and heat it for at least 35 minutes before baking.
- Shape the rounds. Place each dough ball on a separate piece of parchment on a cool work surface; the paper is for shaping only and must not enter the oven. With damp fingertips, gently press into a round about 7–8 inches (18–20 cm) across and ⅝ inch (1.5 cm) thick. Do not use a rolling pin. Cover loosely and let rise for 25 minutes.
- Press the pattern. Just before baking, wet your fingertips and press parallel lines into each round, then cross them to make a diamond pattern. Make definite indentations without cutting through the dough. Distribute the nigella seeds evenly over the breads.
- Bake in batches. Use a dry wooden peel or the back of a second, cool sheet pan, lightly dusted with the same all-purpose flour, for loading. With a wide bench scraper, gently loosen a round from its paper and support it as you move it onto the peel; leave all paper behind. Give the peel a small shake to check that the bread slides. If it sticks, gently lift the stuck edge with the scraper and dust just that spot; do not pull or force the dough. Slide it directly onto the hot inverted pan, using dry oven mitts and keeping hands clear of the hot metal. Bake only as many as fit comfortably, usually two at a time, keeping the others loosely covered. Bake each batch for 8–10 minutes, until puffed and lightly golden. Keep the oven closed for the first 7 minutes.
- Soften and serve. Loosely wrap the hot breads in a clean kitchen towel and rest for 10 minutes to soften the thin crust. Serve warm, or cool completely on a rack before storing.
Nutrition
Notes
- Weigh the dough ingredients: US measures are rounded. Select Metric for the source weights and the intended 75% dough hydration. The water for shaping is separate and is not poured into the dough.
- Sticky dough: Use damp hands and a bench scraper rather than kneading in extra flour. The dough should become elastic while remaining soft.
- Nigella: These seeds are also called ćurekot or kalonji. They are included in this version and are different from ordinary cumin.
- Timing: The rising and resting total includes the initial 15-minute rest, 45-minute first rise, 20-minute bench rest, 25-minute final rise, and 10-minute towel rest. Oven preheating overlaps with the rests. Baking time allows for two batches; larger quantities take longer.
- Paper-free baking: Parchment is only a cool shaping surface and is removed before baking. Ordinary parchment and wax paper must not enter this 480°F (250°C) oven. Use a dry, lightly flour-dusted peel or second cool inverted pan; loosen each round gently with a wide scraper and check that it slides before loading. Use only a light surface dusting of the same flour, never knead extra flour into the dough.
- Storage: Best the day it is baked. Cool completely before sealing; keep for about one day at room temperature or freeze for up to three months. Lightly moisten and reheat at 350°F (180°C) for 5–7 minutes.
- Nutrition: Estimated per whole bread from the metric ingredient weights, using the WPRM calculator plus Steenbergs nigella-seed nutrition data. Flour and seed brands vary.
What Is Bosnian Somun?
Somun is closely associated with Bosnian grilled food, especially ćevapi. Its soft crumb holds meat juices and spreads, while the thin crust stays easy to bite through. The rounded shape and fingertip pattern give it a recognizable appearance.
Somun and lepinja are related flatbreads, but the names are not used identically in every region or bakery. This version focuses on a soft Bosnian-style bread with a diamond pattern and nigella seeds.
Use the Right Flour and Keep the Dough Soft
The original formula uses German Type 550 wheat flour. Unbleached US all-purpose flour is a practical starting point, although protein content and water absorption vary by brand. A scale is especially helpful here: measuring flour by volume can pack substantially more flour into the dough than intended.
The dough water equals 75% of the flour weight. That makes a sticky dough rather than a firm ball. Keep the separately measured shaping water nearby for wetting your hands and the work surface; do not add it to the mixing bowl.
A short covered rest after the first mixing helps the flour absorb water. Kneading, one set of folds during the first rise, and the later rests build enough structure to handle the dough without making it dry.
Understand the 75% hydration
In Metric, 350 ml of water goes into the initial mix and another 25 ml carries the salt, giving 375 ml for 500 g of flour. That is 75% hydration by baker’s percentage. The separate 40 ml for dampening hands and shaping is a handling allowance, not another addition to the dough. Rounded US measures do not reproduce this ratio as precisely, so use Metric and a scale when diagnosing dough problems.
After kneading, the dough should stretch more willingly and pull away from parts of the bowl while remaining soft and sticky. It is not meant to clean the bowl completely or become a dry, firm dinner-roll dough. Flour brands absorb water differently; give the measured flour time to hydrate before deciding that stickiness is a fault.
Build structure through mixing and fermentation
The initial two-minute mix removes dry patches. The covered 15-minute rest gives the flour time to absorb water; then gradually incorporate the salt dissolved in its separate water rather than pouring everything in abruptly. Knead at the card’s low to medium-low speed until the dough becomes more elastic. Keep to your mixer’s operating instructions and pause if the motor struggles.
During the first rise, one set of four folds supports the wet dough without kneading in extra flour. Lift each side gently toward the center rather than tearing it. Cover again so the surface stays supple. Look for a noticeably aerated, expanded dough, with bubbles and a softer, lighter feel, alongside the timing guidance. A cold kitchen can slow fermentation; the clock alone cannot force unrisen dough to be ready.
Shape Gently and Press the Pattern Late
Use a scraper to divide the dough and form loose rounds with damp hands. Let them relax before pressing into flatbreads. A rolling pin pushes out too much of the trapped air, so use your fingertips and handle the rounds gently.
Press the diamond pattern just before the breads go into the oven. Make a set of parallel grooves, then cross them with a second set. The marks should be distinct, but your fingers should not tear all the way through the dough. Sprinkle the nigella seeds over the surface after making the pattern.
Divide, relax, then flatten
Use a scraper to lift and divide the dough rather than dragging sticky pieces across the counter. Damp does not mean flooded: moisten your hands and the work surface lightly. Make loose rounds and cover for the twenty-minute bench rest. If a piece springs back strongly, let it relax instead of forcing it flat. Keep portions near the same weight when scaling so the breads bake at a similar pace.
Press gently toward a round of even thickness, without squeezing the whole center flat. A thick mound can remain doughy while a very thin edge dries. Let the shaped rounds complete their final rise before making the pattern. Keep waiting breads loosely covered; a dried skin interferes with expansion and makes the surface less supple.
Make grooves, not cuts
Use damp fingertips to press a line of connected indentations across the soft surface. Repeat in parallel, then make a second set at an angle to form diamonds. Press firmly enough that grooves remain visible, but stop before your fingers tear through the dough. A knife produces cuts rather than this characteristic pressed surface. Add the nigella after marking and bake promptly, so another long rise does not erase the pattern.
Give the Baking Surface Time to Heat
An inverted heavy sheet pan provides a flat, hot surface for the breads. Heat it in the oven for at least 35 minutes before baking. Starting this during the dough rests keeps the process moving without shortening the preheat.
Shape and proof the rounds on separate pieces of parchment on a cool work surface, but remove every piece before baking. Bake the dough directly on the hot inverted pan; no parchment goes into this oven.
Bake with enough space between the rounds, usually two at a time on a household sheet pan. Keep waiting breads covered, and leave the oven closed for the first seven minutes of each batch. Look for puffed breads with lightly golden areas rather than a thick, dark crust.
Load the bread without baking paper
Keep the oven at 480°F (250°C) and use an oven-safe heavy pan rated for that heat. Ordinary parchment may be limited to 425°F or 450°F; wax paper is not a substitute. Neither is used in the oven here.
For loading, use a dry wooden peel or the back of a second, cool sheet pan, lightly dusted with the same all-purpose flour. Gently loosen each proofed round from its paper with a wide bench scraper, supporting the soft dough as you move it onto the peel. Leave the paper behind. Give the peel a small shake: the round must slide freely before you approach the oven. If a spot sticks, lift that edge gently with the scraper and dust just underneath it. Do not pull the round loose or knead extra flour into the dough.
Transfer each round promptly so the damp dough does not sit and stick to the loading surface. Slide it directly onto the preheated inverted pan, keeping your hands away from the hot metal and using dry oven mitts. This light surface dusting is only a handling aid; keep the measured dough formula unchanged.
Judge the bread, not only the timer
A hot surface transfers heat into the base immediately, helping the wet dough expand during a short bake. The oven reaching its set temperature does not necessarily mean a heavy sheet pan has fully heated; allow the full preheat specified in the card. Open briefly to load each batch, then keep the door closed for the first seven minutes.
Finished somun should be expanded, with lightly golden patches and a set underside rather than a pale, wet base. The crust should stay thin. After the towel rest, a cut or torn section should show a soft, porous crumb that holds its structure. A shiny, gummy seam or paste-like center indicates insufficient baking; a towel rest softens crust but cannot finish raw dough. If needed, return an underbaked bread to the oven and check again rather than extending every batch by a fixed amount.
Troubleshooting Somun
A dense or heavy middle
Check whether extra flour made the dough firm, the dough was inadequately developed, or the rises were shortened. Forceful rolling can also remove the gas that the rises created. Keep the metric formula, fold during the first rise, and shape gently. Distinguish a fully baked but compact crumb from a wet, gummy center, which needs more baking.
A pale crust and dry bread
An insufficiently heated baking surface can stretch a short bake into a long drying process. Preheat the pan fully and avoid repeatedly opening the oven. Do not compensate for weak initial heat by baking every bread until it develops a dark, thick crust. If your oven runs cool, an oven thermometer can help check its actual temperature.
A disappearing diamond pattern
Shallow marks tend to close as the dough expands. Make distinct grooves immediately before loading, after the final rise, without tearing through. Mark each batch when it is ready for the oven rather than marking all waiting breads early.
A hard or dry surface
Too much flour, an uncovered proof, or excessive baking can dry the exterior. Cover the dough between handling stages, keep the bake short but complete, and use the ten-minute towel rest to soften the thin crust. Unwrap afterward and cool on a rack before sealing so condensation does not soak the bread.
Keep Somun Soft and Reheat It Well
Loosely wrap the hot breads in a clean kitchen towel for ten minutes. The trapped warmth and steam soften the thin crust. Serve warm, or unwrap and cool completely on a rack before storing.
Somun is best on the day it is baked. For short storage, seal the cooled bread and keep it at room temperature for about a day. For longer storage, wrap individual breads airtight and freeze for up to three months.
To refresh the bread, lightly moisten the surface and warm it at 350°F (180°C) for about 5–7 minutes. Let it rest briefly before slicing or tearing.
Frequently Asked Questions
Why is my somun dense?
Too much flour, shortened rising time, or forceful shaping can make it dense. Keep the dough soft, give it the full rests, and press it gently instead of rolling it out.
What are the black seeds on top?
They are nigella seeds, also called ćurekot or kalonji. They are different from ordinary cumin. This recipe includes them as part of the bread’s flavor and topping.
Can I bake all the breads at once?
Only if your oven has a large enough, evenly heated surface. Small batches give the rounds more room and help maintain strong bottom heat. Larger recipe quantities need more baking batches.
Why did my diamond pattern disappear?
The indentations may have been too shallow or made too early. Press clear grooves with damp fingertips immediately before baking, without cutting through the dough.